
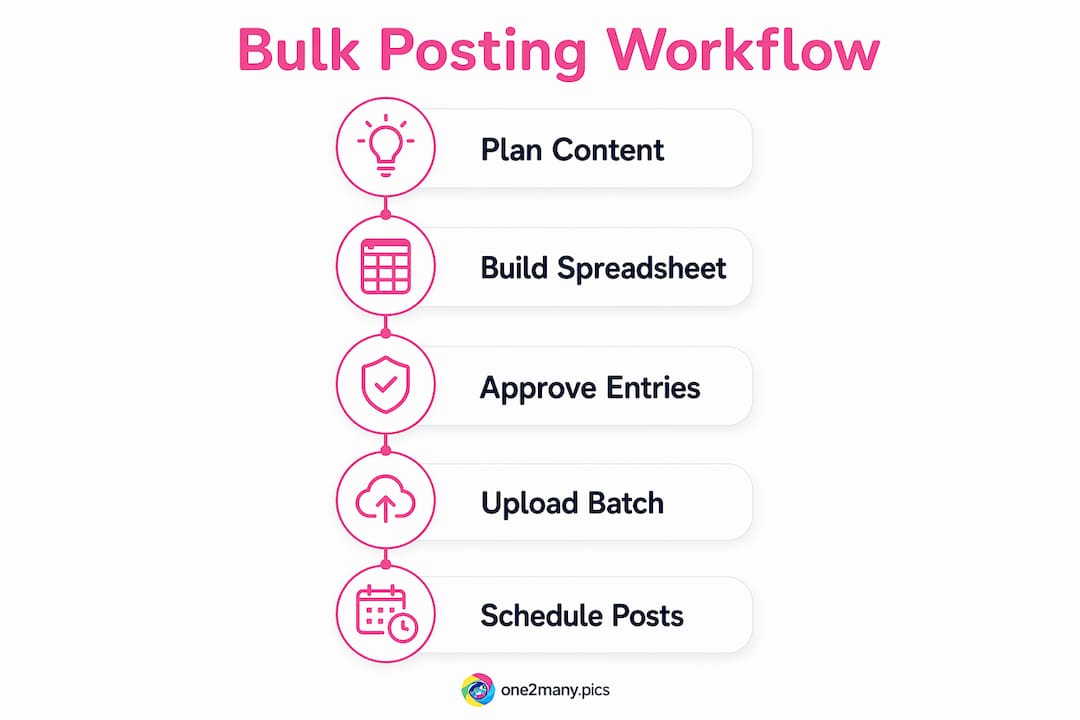
A workflow for bulk content posting is defined as a repeatable, multi-stage process that batches content creation, formatting, and scheduling into a single coordinated session. Social media managers who adopt this approach can schedule 100+ posts in roughly 5 minutes using a structured CSV workflow and a dedicated 60–90 minute weekly session. Frameworks like P.L.A.N.S. and BATCH give that session structure. Tools like Buffer, Hootsuite, and BrandGhost handle the distribution. The result is fewer errors, less context-switching, and a publishing calendar that runs on autopilot while you focus on strategy.
What tools and setup does a bulk content workflow require?
The right setup separates a workflow that scales from one that collapses under its own weight. Before you upload a single post, you need three things in place: a centralized content repository, a defined approval gate, and a scheduling tool that supports bulk operations.
Centralized content repository
Google Sheets or Airtable works as your single source of truth for all post data. Every caption, media URL, hashtag set, UTM tag, and scheduled timestamp lives in one place. This matters because offline editable data sources like CSV or JSON files also serve as backups when a scheduling platform goes down. If your tool fails mid-batch, you still have every post intact and ready to re-import.
Approval status gating
Add an "Approved" column to your spreadsheet. Only rows marked Approved move forward to upload. This single field prevents a half-finished draft or a post with a broken link from going live. Centralized content pipelines with a defined approval status field are critical for maintaining content integrity, especially when batch sizes reach into the thousands.
Choosing the right scheduling tool
Not every scheduling tool handles bulk uploads the same way. Here is how the major options compare:
| Tool | Bulk CSV Upload | Platform-Specific Customization | Max Batch Size |
|---|---|---|---|
| Buffer | Yes | Limited | Varies by plan |
| Hootsuite | Yes | Yes | Varies by plan |
| BrandGhost | Yes | Yes | High |
| Tareno | Yes | Yes | 100+ per session |
Unified scheduling tools that support platform-specific customization reduce tab-switching fatigue and keep brand messaging consistent across channels. Pick a tool that lets you map CSV columns to platform fields and preview posts before they go live.
Pro Tip: Start with one scheduling tool and master its CSV import format completely before adding a second platform. Mixing import templates across tools is the fastest way to corrupt a batch.
How do you build and format a content batch?
Content batch creation follows a clear sequence. Skipping steps here is where most bulk workflows break down.
-
Plan your content calendar first. Decide post topics, publishing cadence, and target platforms before writing a single caption. A content calendar template in Google Sheets or Airtable works well. Assign each row a platform, a content pillar, and a target date.
-
Write captions with all required elements. Each caption needs the full text, relevant hashtags, a call to action, and any UTM-tagged links. Keep platform character limits in mind: Instagram allows 2,200 characters, X (formerly Twitter) caps at 280, and LinkedIn sits at 3,000. Write platform-specific variants in separate columns rather than trying to fit one caption everywhere.
-
Prepare and host media assets. Upload images and videos to a cloud storage location (Google Drive, Dropbox, or an S3 bucket) and paste the direct URLs into your spreadsheet's image_url column. CSV bulk upload columns typically include platform name, caption, post date, image URL, and hashtags. Missing any of these fields causes import errors.
-
Normalize time zones across all rows. Pick one time zone standard (UTC works best for multi-region teams) and apply it to every timestamp. A single row in the wrong time zone can push a post live at 3 a.m. instead of 9 a.m.
-
Run a format check before saving the final CSV. Confirm that date columns use a consistent format (YYYY-MM-DD HH:MM is the safest), that no caption cells contain unescaped commas, and that every image URL resolves to a live file.
Pro Tip: Use a spreadsheet formula to auto-generate UTM tags from a base URL and campaign name. This eliminates manual tagging errors and keeps your analytics clean across every post in the batch.
For creators managing scalable posting across platforms, this preparation phase is where the real time savings accumulate. A well-built batch template cuts future session time by more than half.

What is the best process for uploading and scheduling bulk posts?
Uploading a batch is not a one-click operation. Each step in the upload phase requires attention to avoid errors that are difficult to fix after posts go live.
-
Import your CSV through the tool's bulk upload interface. Most tools have a dedicated "Bulk Schedule" or "Import Posts" section. Drag and drop the CSV file or use the file picker. Do not modify the file while it is uploading.
-
Map columns to platform fields accurately. The tool will ask you to match your CSV columns to its internal fields. Match "post_date" to the scheduling timestamp, "caption" to post text, and "image_url" to the media field. Set default values for any optional columns you left blank.
-
Preview every post in the editable grid. Most bulk scheduling tools display an editable grid after import. Scroll through every row. Look for truncated captions, missing images, and incorrect dates. Fix errors directly in the grid rather than going back to the CSV.
-
Schedule the entire batch in one session. Confirm all posts and hit schedule. Spreading scheduling across multiple sessions increases the chance of duplicate posts or missed slots.
-
Manage exceptions without disrupting the batch. If a last-minute edit is needed on one post, most tools let you edit individual scheduled posts without touching the rest of the batch. Use that feature rather than deleting and re-importing.
Automation pipelines that connect content sources, approval workflows, and scheduling tools handle bulk posting at scale without manual intervention at each step. If your tool supports a staging or dry-run environment, use it before pushing any batch live.
Pro Tip: Schedule your upload session for Tuesday or Wednesday mornings. Platform APIs tend to have lower traffic then, which reduces the chance of rate-limit errors during large batch imports.
Understanding why automated posting saves time at this stage helps you build the case internally for investing in the right tools.
How do you QA and troubleshoot after a bulk upload?
Quality assurance after a bulk upload is not optional. Run a full QA pass immediately after import, before any posts go live.
"Treat bulk scheduling like a software release: pre-flight checks for content stability, calendar logic, and account accuracy prevent errors like incorrect scheduling times and duplicate posts."
The QA checklist covers five areas:
- Images: Verify that every post has an attached image in the correct aspect ratio for its platform. Instagram feed posts need 1:1 or 4:5. LinkedIn favors 1.91:1. A broken image URL shows as a blank post.
- Links: Click every URL in the scheduled posts to confirm they resolve correctly and carry the right UTM parameters.
- Scheduled times: Cross-check at least 10% of posts against your original calendar to catch time zone errors.
- Character limits: Flag any captions that exceed platform limits. Most tools truncate silently rather than throwing an error.
- Duplicate detection: Sort your scheduled posts by date and caption to spot any rows that imported twice.
Post-import verification confirms image formats, link integrity, and time-zone normalization before publishing errors reach your audience. After the batch goes live, monitor engagement analytics for the first 48 hours. Low engagement on a specific platform often signals a formatting issue that slipped through QA.
API rate limits are the most common technical blocker in bulk posting. If your tool returns a rate-limit error, split the batch into two smaller uploads spaced 30 minutes apart. Most platform APIs reset within an hour.
Key takeaways
A structured workflow for bulk content posting reduces publishing errors and saves hours each week by batching every stage from planning to scheduling into one repeatable process.
| Point | Details |
|---|---|
| Build a single source of truth | Use Google Sheets or Airtable to store all post data, media URLs, and approval status before uploading. |
| Gate publishing with approval status | An "Approved" column in your spreadsheet prevents drafts and broken posts from reaching the scheduler. |
| Format CSVs with precision | Include platform, caption, image URL, and UTC timestamps in every row to avoid import errors. |
| Preview before you schedule | Review every post in the scheduling tool's editable grid to catch truncated captions and missing images. |
| Run QA immediately after upload | Check images, links, times, and character limits before any post goes live to prevent audience-facing errors. |
Bulk posting workflows reward discipline more than speed
At One2many, we have seen creators rush the upload phase and spend three times as long fixing errors as they saved by batching. The efficiency gains from bulk posting are real, but they only materialize when the preparation phase is treated as seriously as the publishing phase.
The most common mistake is treating the CSV as a final product before it is actually finished. A missing UTM tag or an unresolved image URL looks harmless in a spreadsheet. It becomes a problem when it goes live to 50,000 followers. Scheduling without strategy produces noise rather than audience growth. The calendar fills up, but engagement stays flat because the content lacks timing logic and pillar structure.
Our recommendation: focus on 3–4 primary platforms before scaling to more. Execution quality drops fast when you try to customize content for six platforms simultaneously. Master the workflow on a smaller surface area first, then expand.
The other lesson is that automation supports human judgment. It does not replace it. AI-generated captions need brand grounding to avoid generic output that requires heavy editing. That editing time cancels out the automation savings. Build your templates around your actual brand voice, and the workflow compounds in value over time.
— one2many.pics
How One2many helps you scale visual content safely
Bulk posting workflows break down when your images trigger duplicate detection or shadowbanning across accounts. One2many solves that problem directly.
One2many is a web-based platform that transforms original images into unique visual variants by stripping metadata (location, device info, timestamps) and generating spoofed versions that bypass platform duplicate detection. For social media managers running cross-platform posting at scale, this means the same core image can go to multiple accounts without triggering suppression. The platform supports bulk processing with workflow integrations, making it a natural fit for the CSV-based pipelines described in this guide. Visit one2many.pics to explore plans built for individual creators, agencies, and marketing teams.
FAQ
What does a workflow for bulk content posting include?
A bulk content posting workflow includes content planning, CSV batch creation, scheduling tool upload, column mapping, post preview, and post-import QA. The full process runs in a single 60–90 minute weekly session.
Which tools support CSV bulk uploads for social media?
Buffer, Hootsuite, BrandGhost, and Tareno all support CSV bulk uploads with column mapping and multi-platform scheduling. Each tool has different batch size limits and platform-specific customization options.
How do you avoid errors in a bulk content upload?
Run a post-import QA pass immediately after upload to check images, links, scheduled times, and character limits. Treating the upload like a software release with pre-flight checks prevents the most common publishing errors.
Why does bulk scheduling sometimes hurt engagement?
Scheduling without a content pillar strategy and engagement timing logic produces volume without relevance. Automation fills the calendar but does not guarantee audience response without deliberate planning behind each batch.
How many platforms should you include in a bulk posting workflow?
Start with 3–4 primary platforms to maintain content quality and brand voice. Expanding to more platforms before the workflow is stable increases the risk of execution errors and inconsistent messaging.